Learn Shooting Manual "The Easy Way"
Shooting with Auto Mode is easy: you compose your image, half-press the shutter button to focus, and then shoot. You can do better with other functions.
Like many beginners, I found the AUTO features on my camera to be a comforting starting point. It was a straightforward way to capture images, especially when I was still learning the capabilities of my camera.
You’ve invested in a good camera, so you should learn to use all its settings!
Shooting manually can be a transformative journey for your photography. While it may seem daunting initially, mastering manual mode gives you complete control over your camera settings, empowering you to create more artistic and imaginative images.
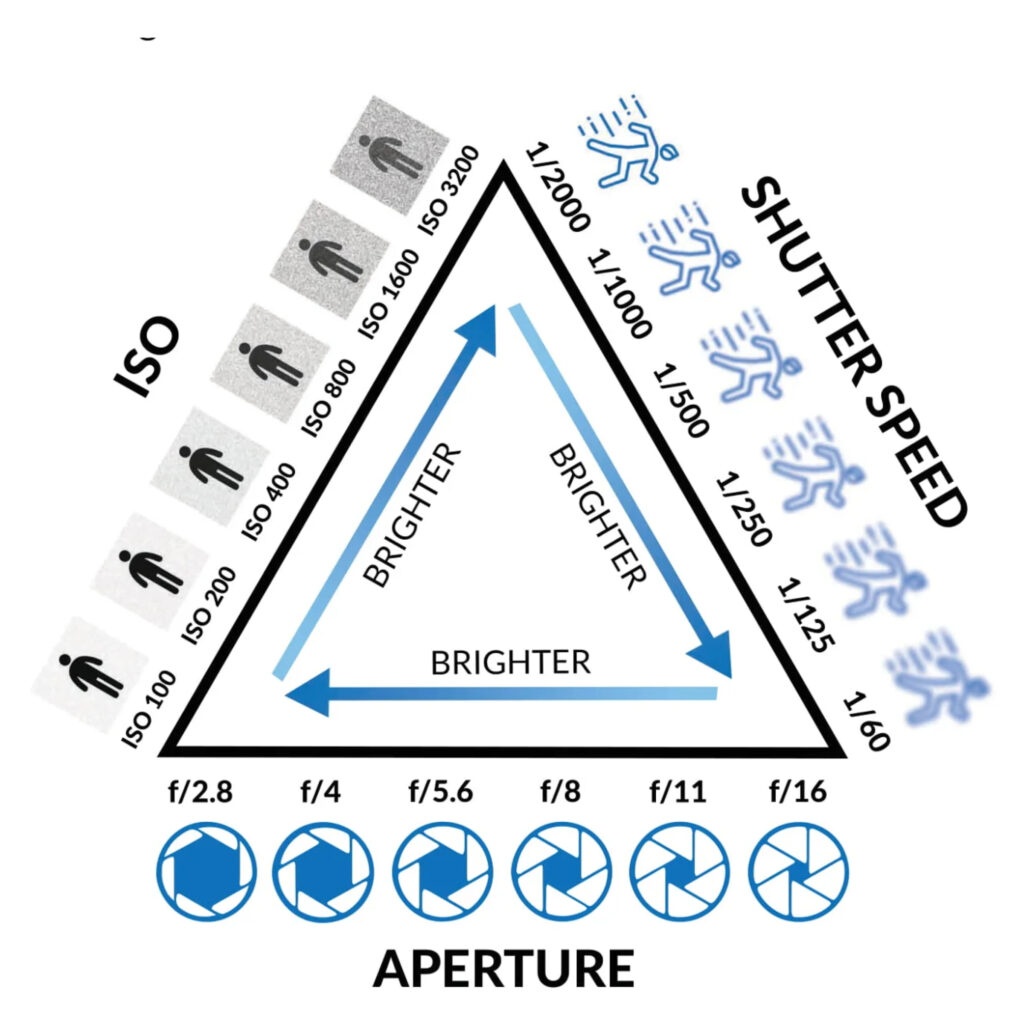
To learn how to shoot manually, you’ll first need to familiarize yourself with the three key camera settings: aperture, shutter speed, and ISO. These settings interact with each other to control the exposure and depth of field in your photos. Once you understand the role of each setting and how they work together, you can begin experimenting with different combinations to achieve the desired result.
Remember, practice is the key to perfection in photography. So, as you embark on your journey to master manual mode, don’t hesitate to experiment and take numerous photos. Each shot will give you valuable experience and confidence in your skills.
Do you want to understand Manual mode like a pro?
If you want to become a master of manual mode, get ready!
What is the Manual Mode?
Manual Mode gives you complete control over your camera settings. Once your camera is set to Manual, you can adjust different settings to make your photos appear as dark or light as you want.
Most importantly, shooting in Manual lets you adjust the three key exposures: ISO, APERTURE, and SHUTTER SPEED.
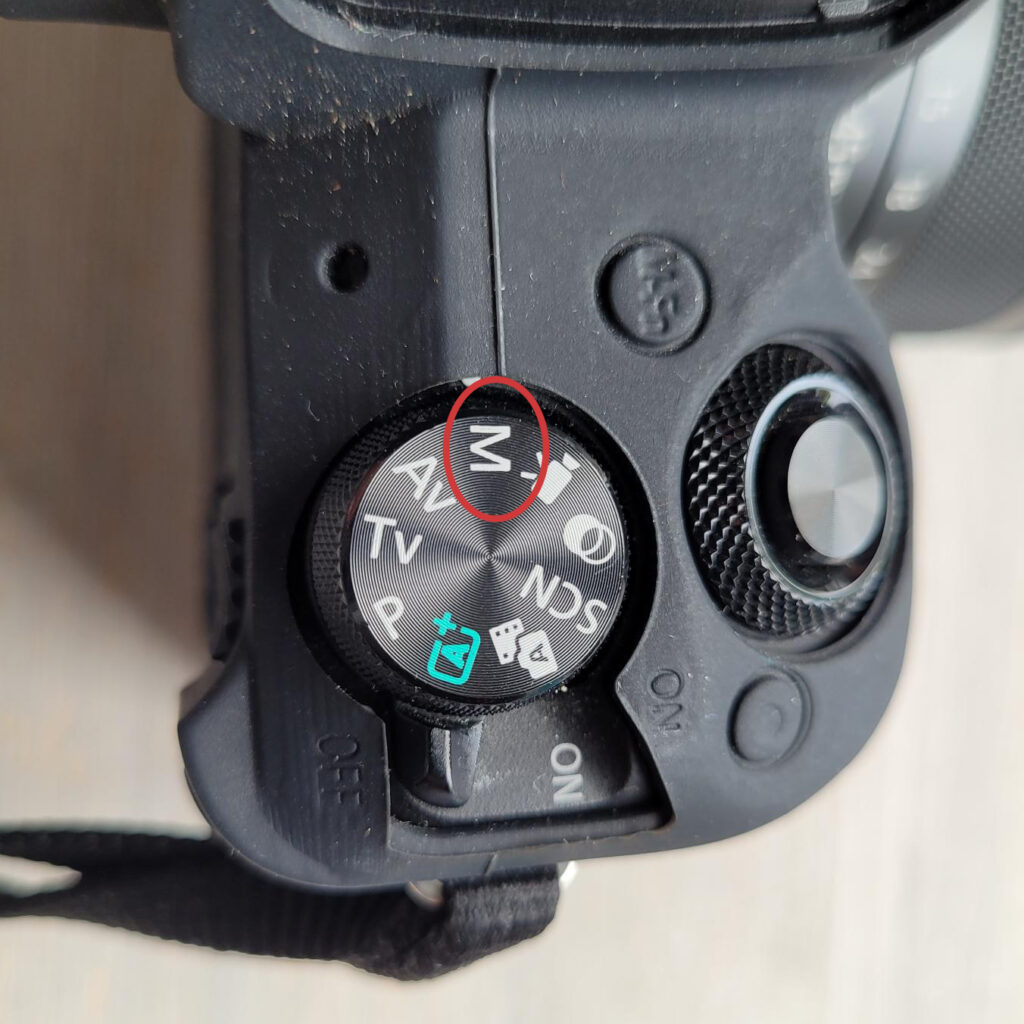
First, turn the dial to “M.”
Manual Mode is a versatile tool that can enhance your photography skills. It allows you to capture sharp, well-exposed photos in various situations, making it a valuable asset on your photography journey.
Using manual Mode on a camera offers several advantages that can enhance your photography skills and help you achieve specific creative effects. Here are some reasons why you might want to use manual Mode:
1. Control over Exposure Manual Mode allows you to independently set the aperture, shutter speed, and ISO, giving you complete control over the exposure of your photos. This is particularly useful in challenging lighting conditions where automatic modes might not yield the desired result.
2. Creative Flexibility**: You can achieve specific artistic effects by manually adjusting settings. For example, you can control the depth of the field by changing the aperture, capture motion blur or freeze action with shutter speed adjustments, and manage noise levels by setting the ISO.
3-Consistency**: Manual Mode ensures that all your photos have the same exposure settings, even in situations with consistent lighting, resulting in a consistent look and feel.
4. Learning and Understanding**: Manual Mode helps you understand how different settings affect your photos. This knowledge is invaluable for improving your overall photography skills.
5-Special Effects**: Manual Mode allows you to experiment with long exposures for light trails, star trails, or smooth water effects, which are not possible with automatic settings.
6. Control Over Flash**: Manual Mode enables you to balance the ambient light with the flash output, which enhances results when using an external flash or multiple light sources.
7. Shooting in RAW**: Precisely controlling exposure settings can significantly improve post-processing results when shooting in RAW format.
**Initially, using manual Mode can be intimidating, but with practice, it becomes a powerful tool for capturing the images you envision.
**Sometimes, you can switch to a different mode, such as Aperture, Shutter or Program Mode. Try them all and see the difference between your photos.
1-SO
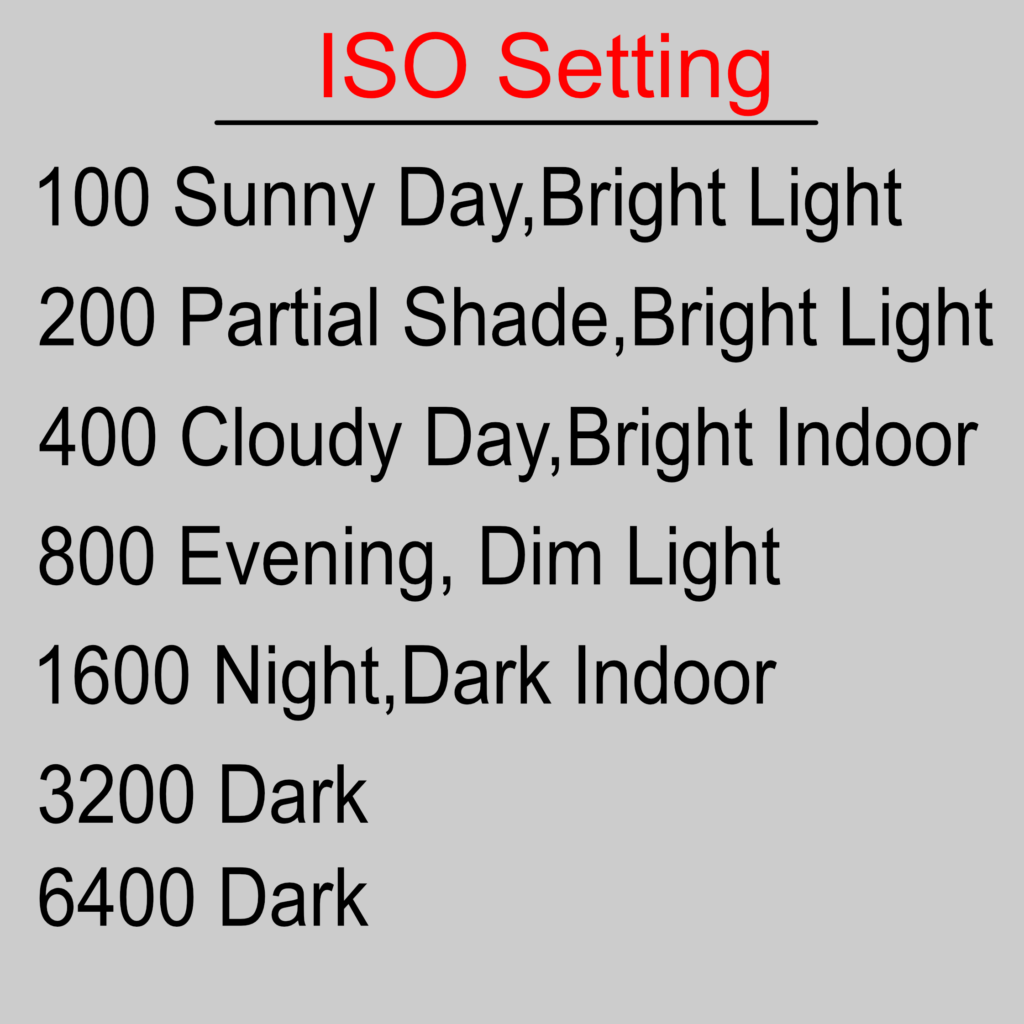
Simply put, ISO controls your camera’s sensitivity to light.
Together, the ISO, aperture, and shutter speed determine the overall brightness of your photos (the exposure). The ISO also affects your pictures in other ways, adjusting the sharpness, depth of field, and overall image quality.
Adjusting the ISO can increase your camera’s light sensitivity, producing a brighter image.
Say you’re shooting at night, and your shots keep turning out too dark. If you’re working in Manual mode, you can boost your ISO, and your images will instantly brighten up.
On the other hand, if you’re shooting on a sunny day and want to reduce your exposure, you can drop the ISO to achieve a darker result.
Therefore, I recommend leaving your ISO at its lowest value (100-400) unless you specifically need to raise it (e.g., shooting in low light).
2-Aperture
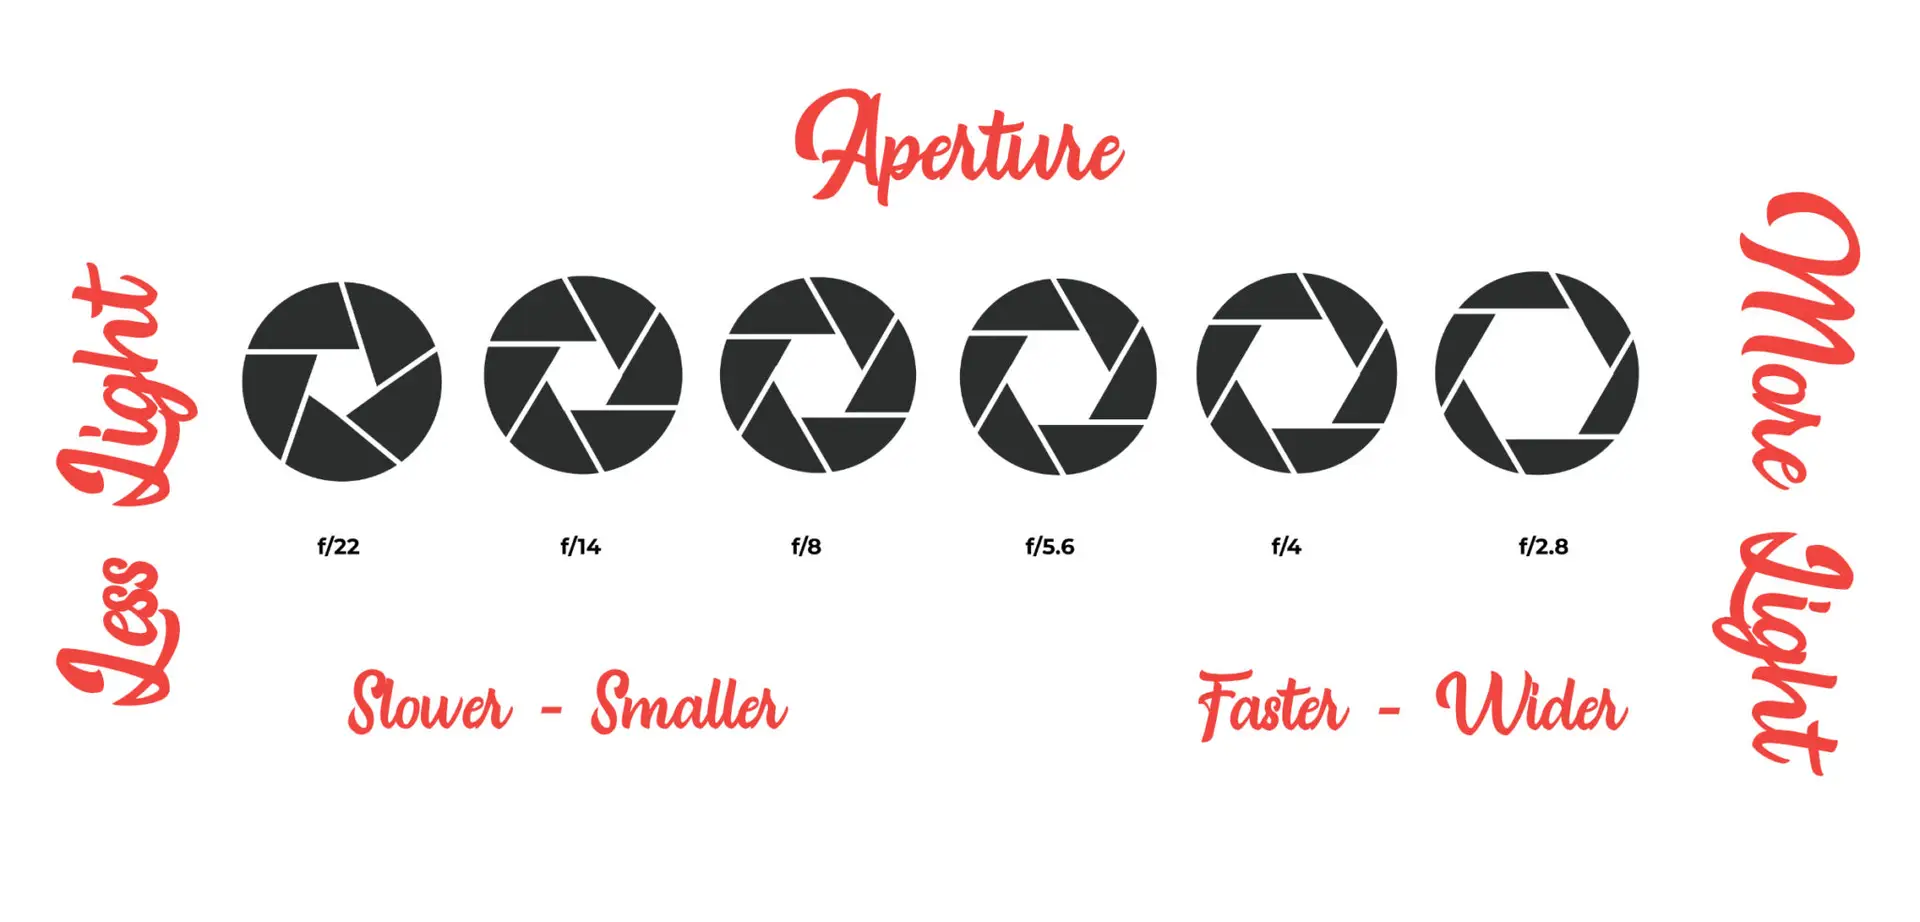
The aperture controls how wide the lens is open.
Aperture Priority (AP) mode lets you control the aperture and ISO while your camera selects the shutter speed. It’s also an excellent transitional mode if you’re unsure about using Manual mode and want to experiment with different settings.
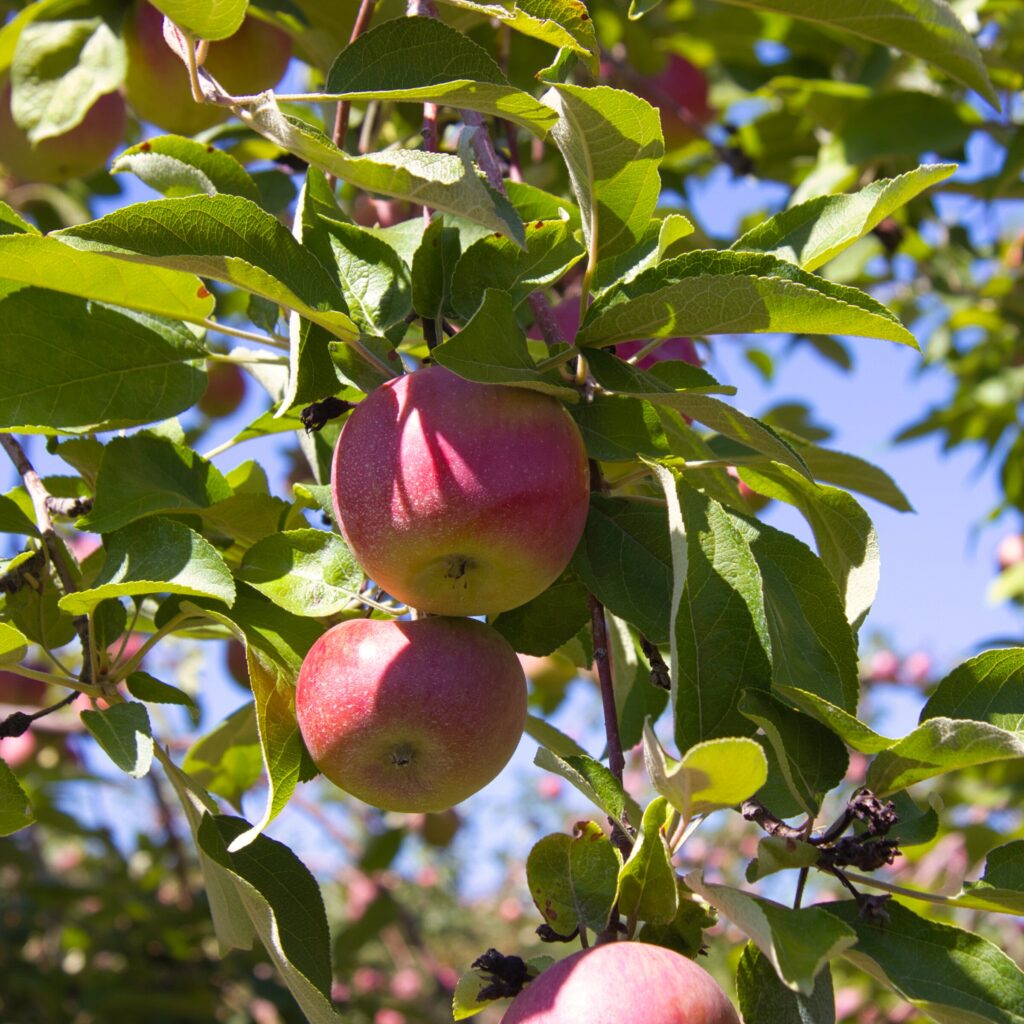
The aperture is called an F-stop; you’ll sometimes see this written as “F/” followed by a number (F/2.8). This is the setting you need to master to nail the depth of field you want! A low number aperture (F/1.4 – F/5.6) gives you a shallow depth of field effect.
In simple terms, the lower the number, the more out of focus your subject’s background will be.
If you are shooting a landscape and want the entire scene, including your subject and the background, to be in focus, you should use a higher aperture (f/10 – f/22).
Bokeh is the dreamy, blurry background of a portrait, and you can achieve it by learning how to play with the aperture.
3-Aperture Priority (AP)
Your camera will display the Aperture Priority as A or Av. With Aperture Priority, your Shutter Speed and ISO will be set automatically. This way, you only control the aperture and focus on the depth of the field.
It’s great for some situations where you want to set the depth of the field but don’t want to spend too much time adjusting the shutter speed.
4-Shutter speed
Shutter Priority mode lets you control the shutter speed and ISO. It’s useful when selecting a particular shutter speed for creative purposes.
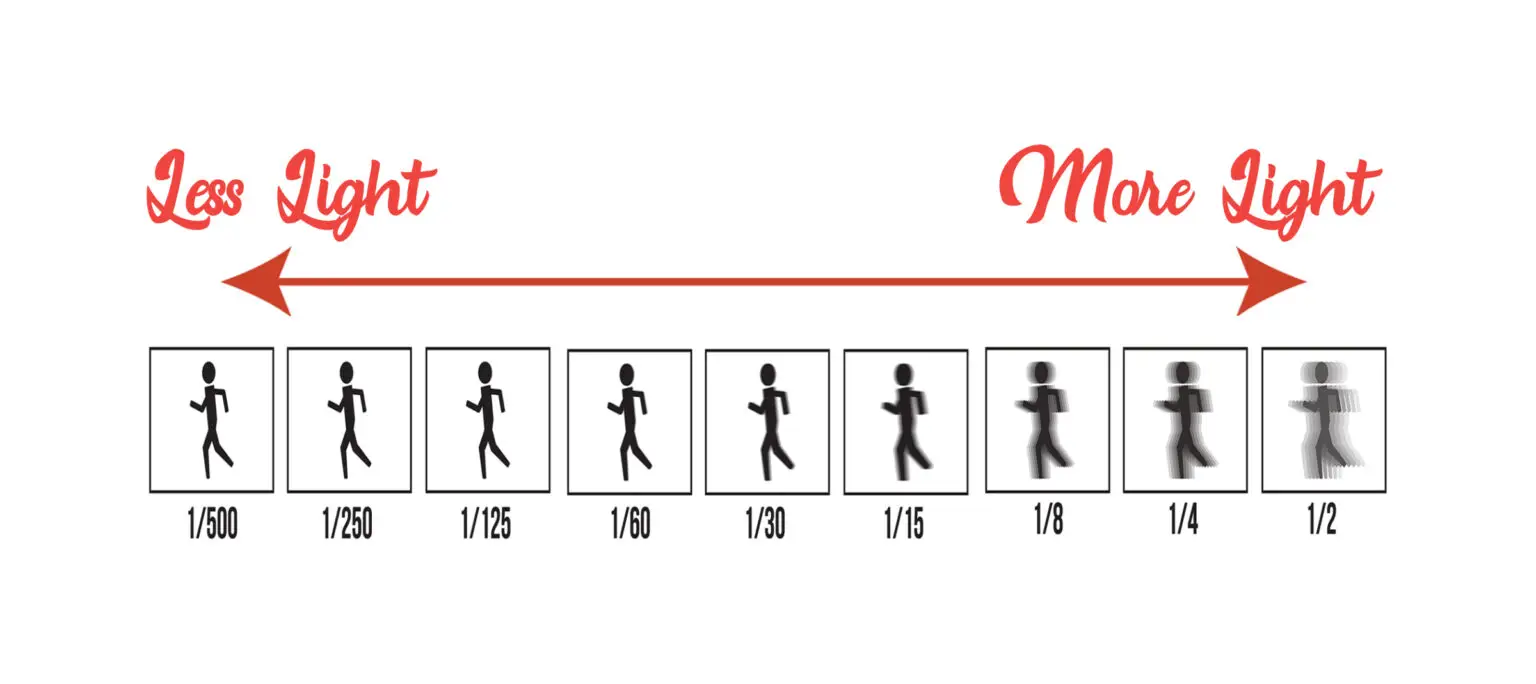
It is the exposure time of an image, which is the duration during which the shutter remains open to allow light to hit the sensor.
The faster the shutter speed, the less light hits the camera sensor and the darker the final image.
The shutter speed also determines image sharpness. A fast shutter speed freezes the action, while a slow shutter speed will produce motion blur.
It pays to use a higher shutter speed to capture sharp images. However, there are times when you may want to create motion blur for artistic effect, in which case a slower shutter speed is the best approach.
This final manual mode setting is worth learning: White Balance.
There are a few different types of modes:
AWB (auto) Daylight. Cloudy, Shade, Tungsten, Fluorescent, Flash and Custom.
It adjusts the colours by removing unrealistic colour casts to make them more natural. You can try this on an object to see the difference.
Ask yourself, should I always want to use Manual mode?
Manual mode is the “best” choice for many situations. It will help you improve your photography and capture sharp, well-exposed, well-composed photos.
That said, you’ll often want to choose a different camera mode instead, such as Aperture, Shutter, or the most accessible program mode. I will take the easy way out if I don’t want to fiddle with my camera dials and miss the perfect shot!
If you want a fast pace, in that case, you’ll want to use a semi-automatic mode instead:
Aperture Priority mode allows you to control the aperture and ISO, while your camera selects the shutter speed. It’s also an excellent transitional mode if you’re not quite ready for Manual mode.
Just keep practicing.
Program mode allows you to control the ISO and adjust the exposure through your camera’s settings. It’s a great transitional mode when you’re switching off Auto.
Manual Shooting is easy with Practice!!


Beautiful photos!
Thank you :O)
Great tips on learning to shoot manual. Your photos are gorgeous! Thank you for the instruction!
Thank you and you welcome :O)
Your photos are beautiful! I didn’t know a lot of this so it will be be very helpful for improving my future publication efforts.
Thank you.With practice you will be good at it. :O)
I’m such an amateur with my camera, these tips are really interesting. I think i May bust out the dslr and try these out
Try, one setting and when you get the hang of it, try another one…I learn it that way …have fun:O)